
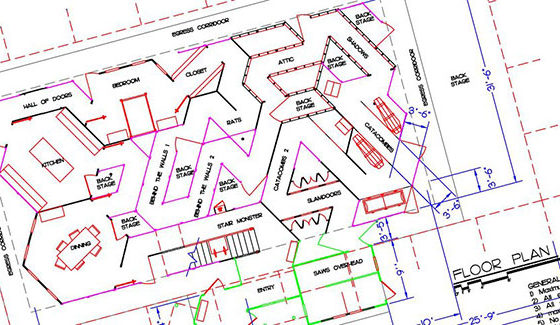
The Triangular Grid System: How To
 Developed and perfected by Leonard Pickel over the last 40 years, the Triangular Grid System is the best most innovative panel system in the industry. It allows for longer pathway per square foot, more twists and turns than a square grid, and is more structurally solid. The Triangular Grid System is quicker to set up and strike so that it’s easier and faster to alter or rearrange rooms for future redesigns, and if you have to take the show down, store it or move it, the Triangular Grid System packs in half the space of typical wall systems.
The Grid
Since the wall panels are 4′ wide, each side of an equilateral triangle on the grid is 4′, but the height of a 4’x4’x4′ equilateral triangle is only 3′-6″ (give or take). So when you layout the grid, all of the parallel lines are 3′-6″ apart, and each of the vertices are 4′ apart. The vertices on each parallel line of offset 2′ from the line beside it, which creates the triangle. To make things easier, you can purchase isometric graph paper to get you started.

Isometric Graph Paper
Designing The Pathway
Taking a lesson from Architectural design, “Form ever follows function,” haunt room designs should be designed from the scare outward. The room concepts must be created before being placed into the floor plan. Use isometric graph paper to sketch out each room plan.
The “rooms” of a triangular grid attraction are not square due to the angles of the grid. They tend to be hexagonal, elongated hexagonal, or the shape of superman’s logo. Set the props or furniture onto the grid so that the entrance, exit and pathway through the room function best for the scare. Then arrange the rooms in the attraction area and draw hallways to connect the rooms.
You’ll notice very quickly into the design of your haunt that there tend to be “dead” triangles that do not fit in the walkway or in a room. Sometimes wasted space, these “dead” triangles can be used for security to get out of the way of patrons, to display props, or as emergency exits.
Try not to have more than three panels in a straight line in the design. Long straight hallways tend to be unstable during installation, and the more twists and turns in the pathway, the less people can see what is about to happen to them. Once you have the full layout drawn up, you are ready to transfer the drawing to full scale.
The Grid On-Site
The first step on-site is to lay carpet down under the attraction. Carpet is an important piece of the Triangular Grid System, because it helps hold the bottom of the panels in place. You can bracket the walls to floor if you prefer, but carpet removes the need to bolt down the panels, saving time and damage to the floor.
Transferring the design to your actual haunt space is fairly easy after it has been designed on paper. To mark the grid on-site, gather an assistant, tape measures (both a 25’ and a 100’), chalk line and 1/2” masking tape. Follow the same steps as you did on paper, only now you’re marking the floor using your drawing as a “road map”.

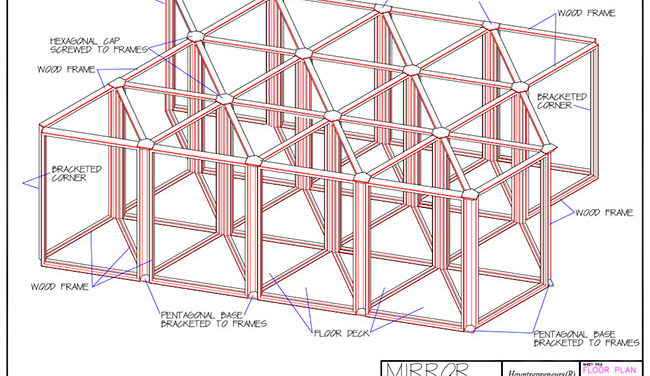
Figure #3
Follow the description above, using the chalk line to mark the bay lines and small pieces of masking tape for the dots. You do not have to chalk out the diagonal lines, unless you want to. The masking tape dots are enough to copy your layout from the paper to the space. Use 1/2” masking tape to “draw” where the walls of the attraction will be located, and you are ready to start setting up the panels. You can even label or write the panel numbers on the tape to speed installation.
Wall Panels
The thing that makes a corridor a corridor is of course, walls! Haunt walls are typically modular panels and 4’ wide by 8’ tall (the same size as a sheet of plywood). A modular Triangular Grid System wall panel consists of a frame of 2x lumber. Sandwiched between 2 sheets of 3/8” plywood or OSB, (Figure 3), are two verticals (2×4 or 2×3) laid flat on the “face” of the board, rather than on the “spine” of the board like a normal wall would be framed, and a top, center and bottom member (2×4, 2×3, or 2×2) completes the panel. The plywood faces are attached to the frame with drywall screws. The frame of the wall panel is held together only by the plywood screwed to them, the 2x members are not connected to each other directly. You can build one-sided walls but plywood gussets plates should be added at all 2x connections for strength.
Using screws only will make the panel easier to modify or repair than a panel that is assembled with nails or adhesive. The finished panel is a sturdy, double-sided wall that has a finished nominal thickness of 2”. Utilizing the same construction method, panels can also be constructed as doorways, windows or with special openings like drop panels in them. READ MORE
