
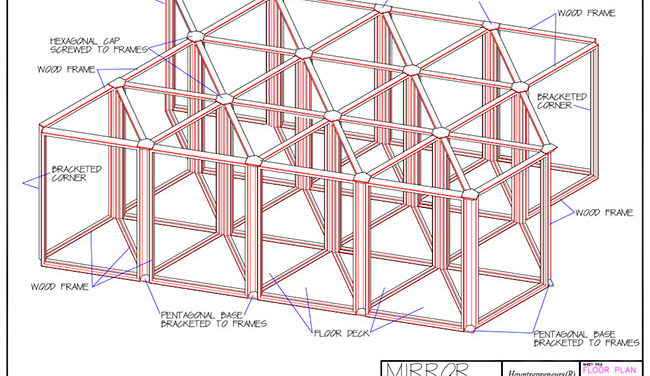
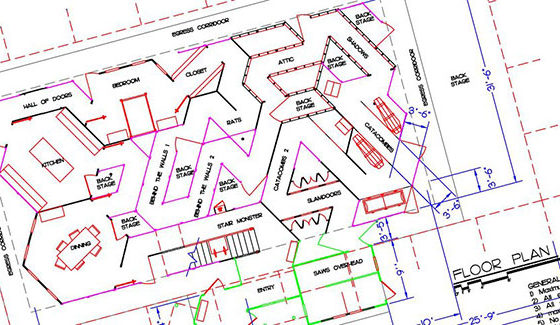
The Triangular Grid System: How To – Continued
Assembly
With the walls built and painted, the next step is installation. Stand two of the panels on taped lines at a 120-degree angle to one other. Connect the two panels with Simpson Strong Tie – Model A21 brackets available at most home improvement store. (Figure 4) These brackets are used for deck and home construction, and are found with the lumber and deck supplies rather than the other hardware.  The A21 brackets come in a 90-degree bend and must be spread for Triangular Grid connections or hammered completely flat for connecting a straight run of walls. Cut a 2×6 to a 120-degree angle and hammer the brackets to exact shape. Use a 1 5/8” coarse drywall screws placed in each bracket hole of the A-21 to attach the panels together. One bracket placed at ankle level and one above shoulder height make them less likely to scratch a patron.
Note: Simpson Strong Tie also makes a gusset plate, which is a tempting alternative to the A-21, but it is made of thinner metal, has more holes and sharp corners. The A21 bracket is the best choice for this connection because of its thickness, clipped corners and 4 screw holes.
Bracing
Once all of the panels are standing, you can add overhead bracing to the system for stability. Part of the reason for the Triangular Grid System is that triangles are more dimensionally stable than squares. The bracing is placed so that it completes the grid. Add a brace everywhere on the grid where there are not panels using 8’ and 4’ 1x lumber, (1×3 or 1×4) with 1 5/8” drywall screws. An 8’ section should reach the end of 3 panels, and be just a bit too short. Larger rooms may need 12’ lumber to reach clear across, or can be left open if the surrounding panels are braced sufficiently. Essentially you are creating a “truss” on its side across the top of the panels. When properly braced, you should be able to walk the pathway and see only 4’ triangles averhead.
The only thing needed to hold the panels to the floor is their weight. Doorways can be places in scare locations, to help secure the base of freestanding walls. The carpet also helps keep the panels stable. When installed correctly, the Triangular Grid System becomes one solid mass, where no one wall can move without the others moving as well.

Hopefully this article has shed some light on the mysterious, but “not as hard as it sounds” Triangular Grid System, While a proven alternative from a traditional square grid layout, the Triangular Grid System, it is not for everyone. Your facility may have certain characteristics (thicker wall panels, oddly shaped space, theme, local codes, etc.) that make it a less than ideal for the Triangular Grid System. If you must have square rooms, or wall panels that meet smoothly at every corner, then the Triangular Grid System is not for you. However, if the space saving characteristics, quick installation, disorienting corridor layout, smaller storage space, builder-friendly components and built-in scare opportunities are of interest to you, then you should implement the Triangular Grid System in the design of your next Haunted Attraction.
