
Haunting on a Budget
By Leonard Pickel, Lead Designer at Hauntrepreneurs.com
There are other ways to build a haunt that are cheaper than building from scratch. There are Used Attractions listed on this website, and if these are still too expensive then you have to go with a found object style haunt. Pick a theme like apocalyptic zombie refuge or a mad max thing. Then start collecting pallets, barrels, dilapidated storage sheds, furniture, anything you can use to make people walk around. Facebook MarketPlace is perfect
for this. There is free stuff listed there every day. Buy a pickup if you don’t have one to haul your treasures and dumpster dive everywhere you go. This approach takes time and a place to store your stuff if you can’t put it on the haunt property before set up.
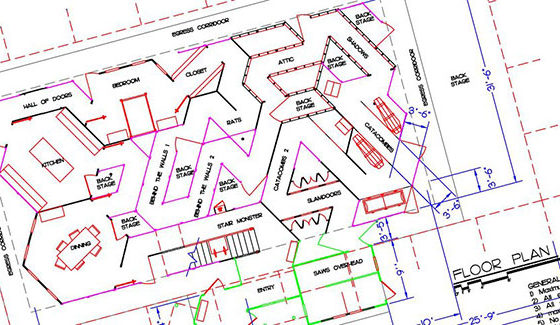
1) Design – the first thing to come up with is what will scare the person in each “scene.” How do you hide the actor or prop? What would the prop look like, what is it made of? What will the prop or actor do to scare people? Then think of what the best approach is to that scare. Place the stuff you collected in a way that forces the patrons past the scare in the best direction. You want the scares to force people forward to accelerate the flow, never back them up. Think about how patrons will react to the scares. You don’t want to scare people into something sharp or unsupported. Perhaps even a mattress for people to fall into. Once you have that drawn up, do the next scene. put them together into a pathway. Best scare first, next to best last if you can. add short hallways between the scenes to build anticipation. 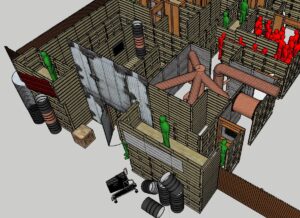
2) Build – Pallets can be stacked 2 high to create a panel like structure but just piling up stuff to create the pathway is more structurally sound. Screw and strap things together and stake it down to the ground if need be. You want stuff that is at least 5′ high so people can’t see over it. When attaching panels to each other I always use metal brackets (Simpson Strong-Tie A21’s mostly) to connect them. If you just screw them together, it becomes much more difficult to take them apart. Even finding the screw head after the scenic paint is time consuming. If you use a bracket, you know that when all of the brackets are taken off, the assembly will come apart easily and quickly.

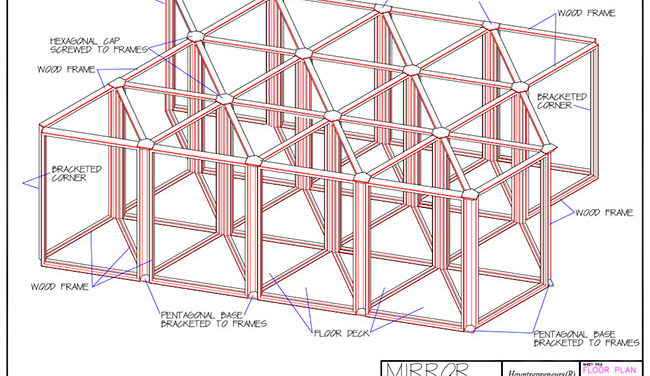
3) Bracing – A brace has one of two forces on it, either compression or tension, but never both. A piece of wood can take care of either force but is better in compression. (You don’t need 2×4 to brace with. A 1×3 is cheaper, easier to screw through and will do the job. A cable, or rope is actually better in tension. Because most of the pressure on a panel is outward, a whole haunt could be braced with cable, if done correctly. Cable is much easier to store and reuse.
4) Paint – White is the new black. Old school haunters, (I know because I am one) painted everything black after a build, but black is hard to paint to be anything other than black and in low light levels, black disappears. If you start with white walls then you can easily distress the walls with different watered-down paint to make drippy grungy walls, and it takes less light to light the room. Sometimes even the wash reflecting off the rest of the haunt can light a room. If  you plan to use spray paint to dust or darken something, spray the surface with water first, and use a couple of colors. The water disguises the feather of a spray can and nothing in nature is only one color. You can mix the spray paint on the wet surface. Watered down paint in browns, greens, and rusty oranges sprayed one color at a time will destress anything new and make it look old. But don’t use a spray bottle that runs the paint through the pump. Pigment is like sand and will wreck the O rings. Instead use a Hudson style sprayer that pressurizes the tank to push the paint through the nozzle.
5) Costumes – Thrift stores are your best source for cheap costumes. Keep an eye out for sales as they try to keep inventory rotating through. Just like the walls, light colored or white garments are best. You can distress them down with paints, tea or coffee and other stains. Dark clothing can be used to hide an actor who is puppeting a prop or comes out of nowhere.
6) Lighting – Haunters spend a lot of time and money scenically painting and distressing props and walls only to light them with colored or UV light and waste all the detailing. Unless there is a reason for the colored light, UV for a 3D haunt for instance, I light my haunts with very dim white light in “practical” light fixtures. Practical as in real light fixtures, a lamp, bathroom fixture or wall sconce. But it’s hard to get a bulb dim enough. The best option in 110v is a 7 watt appliance bulb. These have a standard screw in base. However, if you have a tight budget, low voltage is the way to go. A Malibu type system can be wired through a regular light fixture with low voltage bulbs. They are small and “barn door” or foil can be used to decrease the light level rather than a dimmer and no electrical permit is required to run the lights.
Owner of Hauntrepreneurs(R) Haunt Design, a consulting firm for the Haunted Attraction Industry, Leonard Pickel built his first haunted house in 1976 while still in college. Since that time he has designed over 200 original and creative Haunted Attractions including Haunts for Madison Square Garden, Universal Studios Florida, Six Flags Great America, several Six Flags parks, Morris Costumes and The Playboy Mansion Halloween Party. Leonard’s creative accomplishments include design and sales of the industry’s first turn-key Haunted House ‘kits,’ and the first adaptation of “Field Theory” (triangular grid system) in a Haunted Attraction.